This guide explains how to copy protect content on USB sticks using ProtectUSB Content.
We also highly recommend reading the Best Practices for using ProtectUSB .
“Content” refers to files such as the following:
In the following we’ll refer to these files simply as “Content”.
Note: If you want to copy protect software (executables, apps) instead of content, you need to use ProtectUSB Software.
ProtectUSB Content supports the following copy protection methods:
USB Stick verification
With USB stick verification the content is encrypted and bound to the presence of the USB stick. This means the content is presented directly from the stick (no installation to hard disk) and it can only be accessed while the copy protected USB stick is inserted. An internet connection is not required.
UnlockCode redemption
With this method the content is not bound to a particular USB stick. Instead, the usage is controlled by an UnlockCode which needs to be entered when the content is accessed and which triggers the binding of the content to a particular user account (email/password).
The UnlockCode option is more flexible because it allows the installation of the content to one or more devices and does NOT require the presence of the USB stick. The UnlockCode defines on how many computers the content can be authorized as well as other limitations (e.g. expiration of the content after a certain time).
UnlockCodes are created on the Protect Software web site. An internet connection is required at the time of the first access to allow validation of the UnlockCode. Once the code has been validated, no internet connection is required.
To use ProtectUSB Content the following is required:
The workflow of creating a protected USB stick with content is straight forward. However, it is important to understand which steps are required and which option for unlocking the content are available.
The following steps are required:
A project is identified by a unique ProjectID and binds the content to a certain protected USB stick or UnlockCode. The ProjectID needs to be specified when packaging the content and when the USB stick is protected or UnlockCodes are created. The protected content requires protected USB sticks or UnlockCodes with the corresponding ProjectID in order to present itself.
The content is prepared by using the Content Preparer tool. You need to specify the ProjectID and select how you want to unlock the content (via USB Stick verification or entering an UnlockCode). The result is a directory with all required software and the encrypted content which needs to be copied to the USB stick(s) in the next step.
Note: If you are using Video-DVD data you need to encode the content before you can use the Content Preparer tool. This is done by using the FluxDVD Encoder which is included.
The content is written to the USB stick(s) by using the USB Protect tool. If you don’t work with UnlockCodes, you can license the USB sticks in the same step so that they can be verified by the content.
This step is only required if you don’t use the USB stick(s) for verification but require the customer to enter codes for unlocking. These UnlockCodes are created on the web site.
Before the content can be written to USB sticks, it needs to be prepared. This typically happens by using the Content Preparer tool. Only in case of Video-DVD there is an additional step by using the FluxDVD Encoder.
FluxDVD Encoder is used to encode Video-DVDs to the FluxDVD format. This allows keeping the full DVD functionality while reducing the size because more effective codecs are used.
After starting FluxDVD Encoder click on ‘Open’ and select the ‘Video_ts.ifo’ file of your DVD data. It is highly recommended to copy the DVD’s content to hard disc before processing it.
FluxDVD Encoder will now load the DVD structure and you will be able to customize the DVD content.
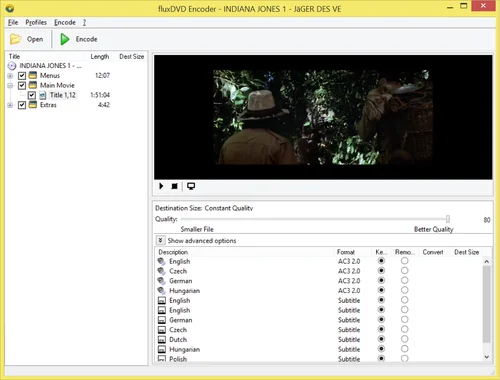
To start the encoding process, just click „Encode“. Depending on the speed of your computer this process can take multiple hours.
Note: Typically no changes are required and you can keep the entire DVD as it is. An optimum size/quality ratio is reached at a quality level 80. Changing the quality level will either increase file size disproportionally to the quality gain or lower the quality disproportionally to the size reduction.
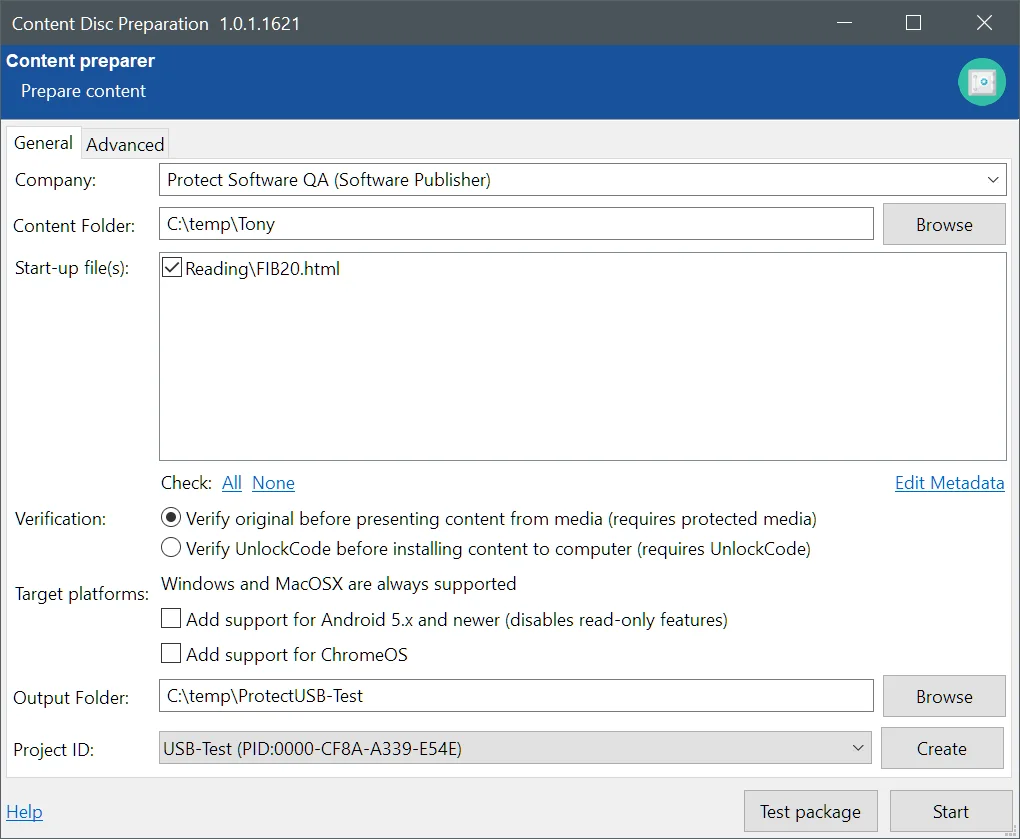
To protect content, you need to start the Content Preparer tool. With this tool you use your source data to create the encrypted content data which will later be written to the USB stick(s).
| Option | Description |
| Content Folder | The “Content Folder” is the folder with the content you want to protected and store on the USB stick. The entire content in the folder will be protected. |
| Start-up file(s) |
This section defines how the content is accessed by either specifying exactly one startup file (which will be presented at startup) or selecting multiple files (for which a table of contents startup file will be generated). As typical startup file (one file selected) you can use the following file types:
If you select multiple files with the exception of MP4, and you have not included an index.html file, an index.html file with links to the selected files is automatically generated. If you want to have your own design, you need to create the index.html file manually, place it into the directory and select it. Some things to consider when creating your own index.html:
<body ondragstart="return false" onselectstart="return false" oncontextmenu="return false" >
|
| Verification options |
The verification options define how the content is accessible: USB Stick verification With USB stick verification the content is encrypted and bound to the presence of the USB stick. This means the content is presented directly from the stick (no installation to hard disk) and it can only be accessed while the copy protected USB stick is inserted. An internet connection is not required. UnlockCode redemption With this method the content is not bound to a particular USB stick. Instead, the usage is controlled by an UnlockCode which needs to be entered when the content is accessed and which triggers the binding of the content to a particular user account (email/password). The UnlockCode option is more flexible because it allows the installation of the content to one or more devices and does NOT require the presence of the USB stick. The UnlockCode defines on how many computers the content can be authorized as well as other limitations (e.g. expiration of the content after a certain time). UnlockCodes are created on the Protect Software web site. An internet connection is required at the time of the first access to allow validation of the UnlockCode. Once the code has been validated, no internet connection is required. |
| Output Folder | Select the destination for the packaged and encrypted content. The content of this directory will later be used to create the protected USB stick(s). |
| Product |
The Product is the element which binds the prepared content to the protected USB stick or UnlockCode. The content will only be accessible if the Product of the content matches the Product of the protected USB stick or UnlockCode. While you can use the same Product for slightly different content, you should create a new Product for separate content to make sure a stick bound to a certain content works also for other content. |
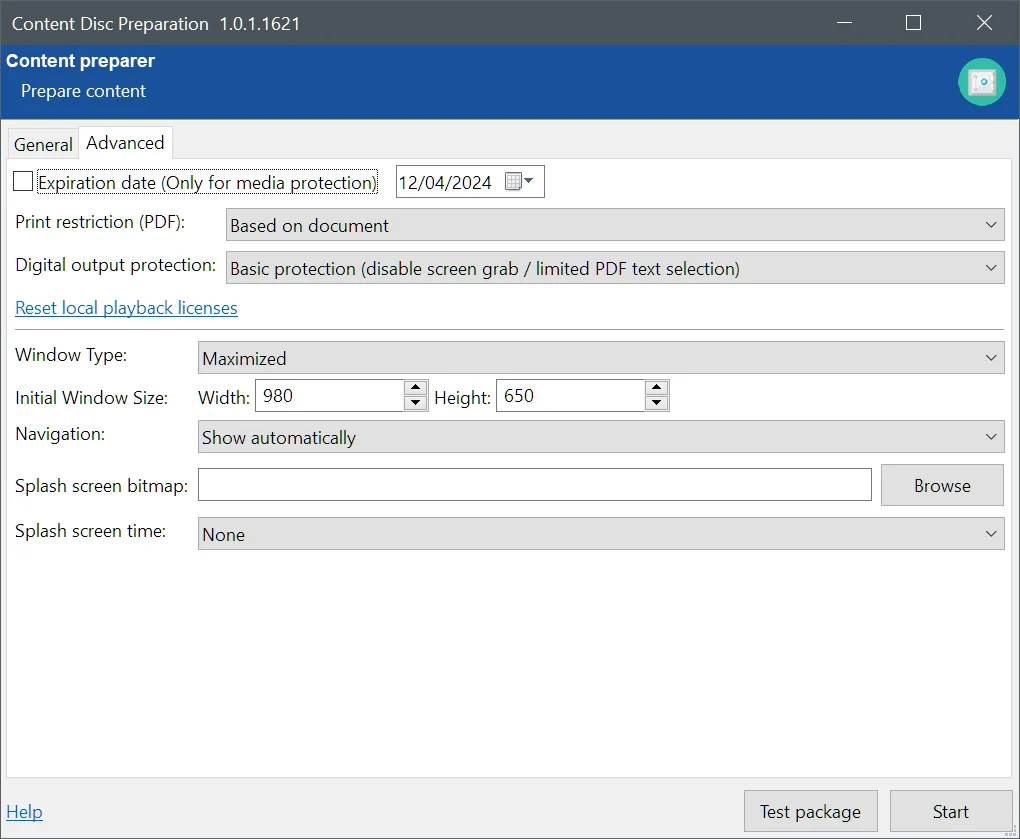
On the Advanced tab you can define some advanced functions as explained below.
| Option | Description |
| Expiration date | The content will cease to work from the date set here, if the option is activated. This works only for media validation and not for content using UnlockCodes |
| Window Type | This setting defines the size of the window which displays the content. In “Maximized” it will use the whole screen and it “Normal” it will use the resolution defined by the Initial Window Size setting. |
| Initial Window Size | If the Window Type is set to “Normal”, the window displaying the content will have the width and height defined here. |
| Navigation |
The "Navigation" option defines when FluxPlayer displays the "Back" navigation button.
|
Before you start the process, you should use the "Test package" function to make sure your content behaves as it should. Once you click the button, the content will be built and displayed exactly the same way as it would from a USB stick.
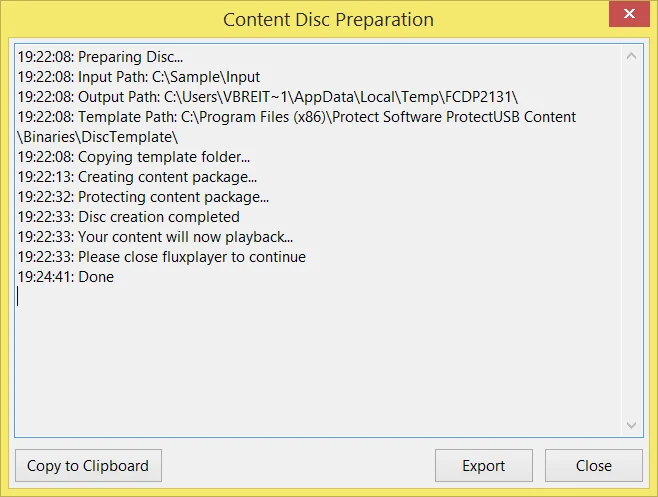
When the content is prepared and after you have closed FluxPlayer after reviewing the content, the window above is displayed.
In the Window above you can click the Export button to export the prepared content into a directory you specify. This especially makes sense if you want to edit the auto-generated (index) HTML files.
To build one or multiple USB stick(s) with the content you have prepared as described in the previous chapters, you need to run the USB Protect tool.
After starting the tool, you need to select the data you have prepared. The tool will automatically detect whether your content requires USB Stick verification or UnlockCodes.
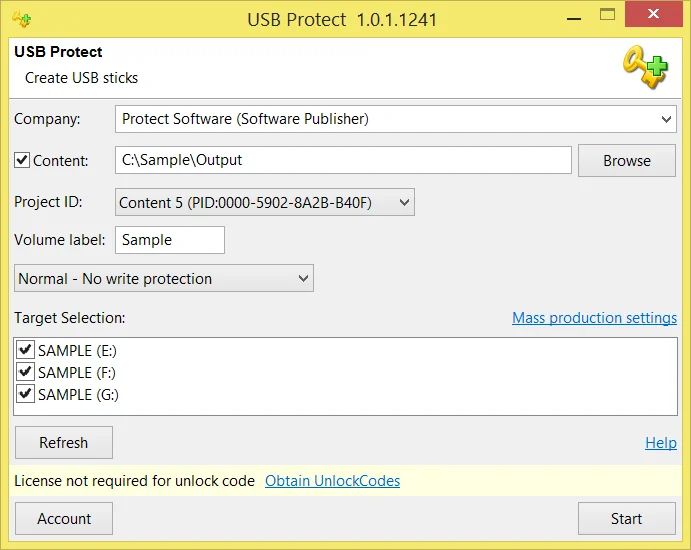
If your content was prepared for USB stick verification, after checking the “Content” checkbox and selecting the folder with the prepared content, the window will look like the following.
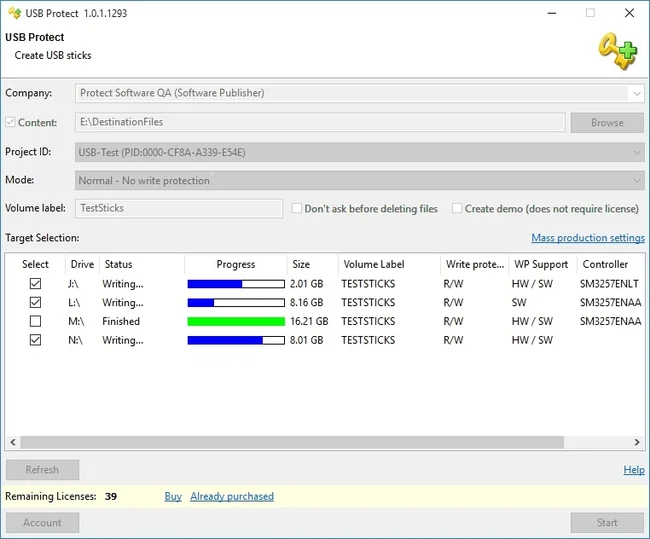
Before you select “Start” to write the actual writing process to the connected USB sticks, you need to make sure the settings for the write process are correct.
| Option | Description |
| Content (Optional) | This content will be copied to the USB stick. If no content is specified, the USB stick(s) will only be licensed for the entered ProjectID. This option is useful for pre- or post-written USB(s) – meaning the content is already on the USB stick(s) or is added later. |
| ProjectID (Mandatory) | This is the ProjectID you created previously and used to package the content you want to bind to the USB stick(s). If you have already specified the content, the ProjectID may have been auto selected. |
| Create Demo | Activate this checkbox to create demo media. Demo media are not permitted to be given to 3rd parties and will display a warning message prior to presenting the content. |
| Target Selection |
This area lists all connected USB sticks. You can check the sticks you want to use for the copy/license operation. The USB stick(s) must be pre-formatted and writable. If you add additional USB sticks during the program is running, you need to click the Refresh button to display the newly added USB stick(s). |
| License Area |
This area displays the currently available number of licenses and enables you to buy additional licenses. Note: If you don’t have licenses, you can still prepare the USB stick(s) in a demo mode, by activating the “Create Demo Medium” checkbox. |
To write one or more USB stick(s), you need to press “Start”.
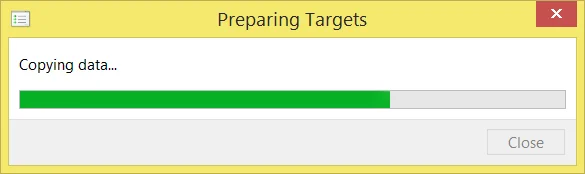
After all USB sticks are written, you see the complete message.
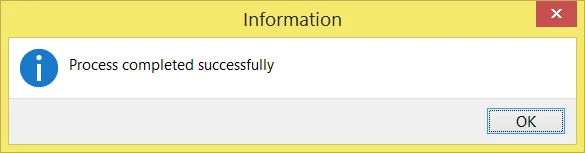
To write new sticks, you just need to connect more sticks and press “Start” again.
Important: USB Protect in USB stick verification mode requires an active internet connection.
To purchase licenses you need to click the “Buy” button in the license area.

Your standard browser window will open and guide you to the web shop where you can purchase licenses.
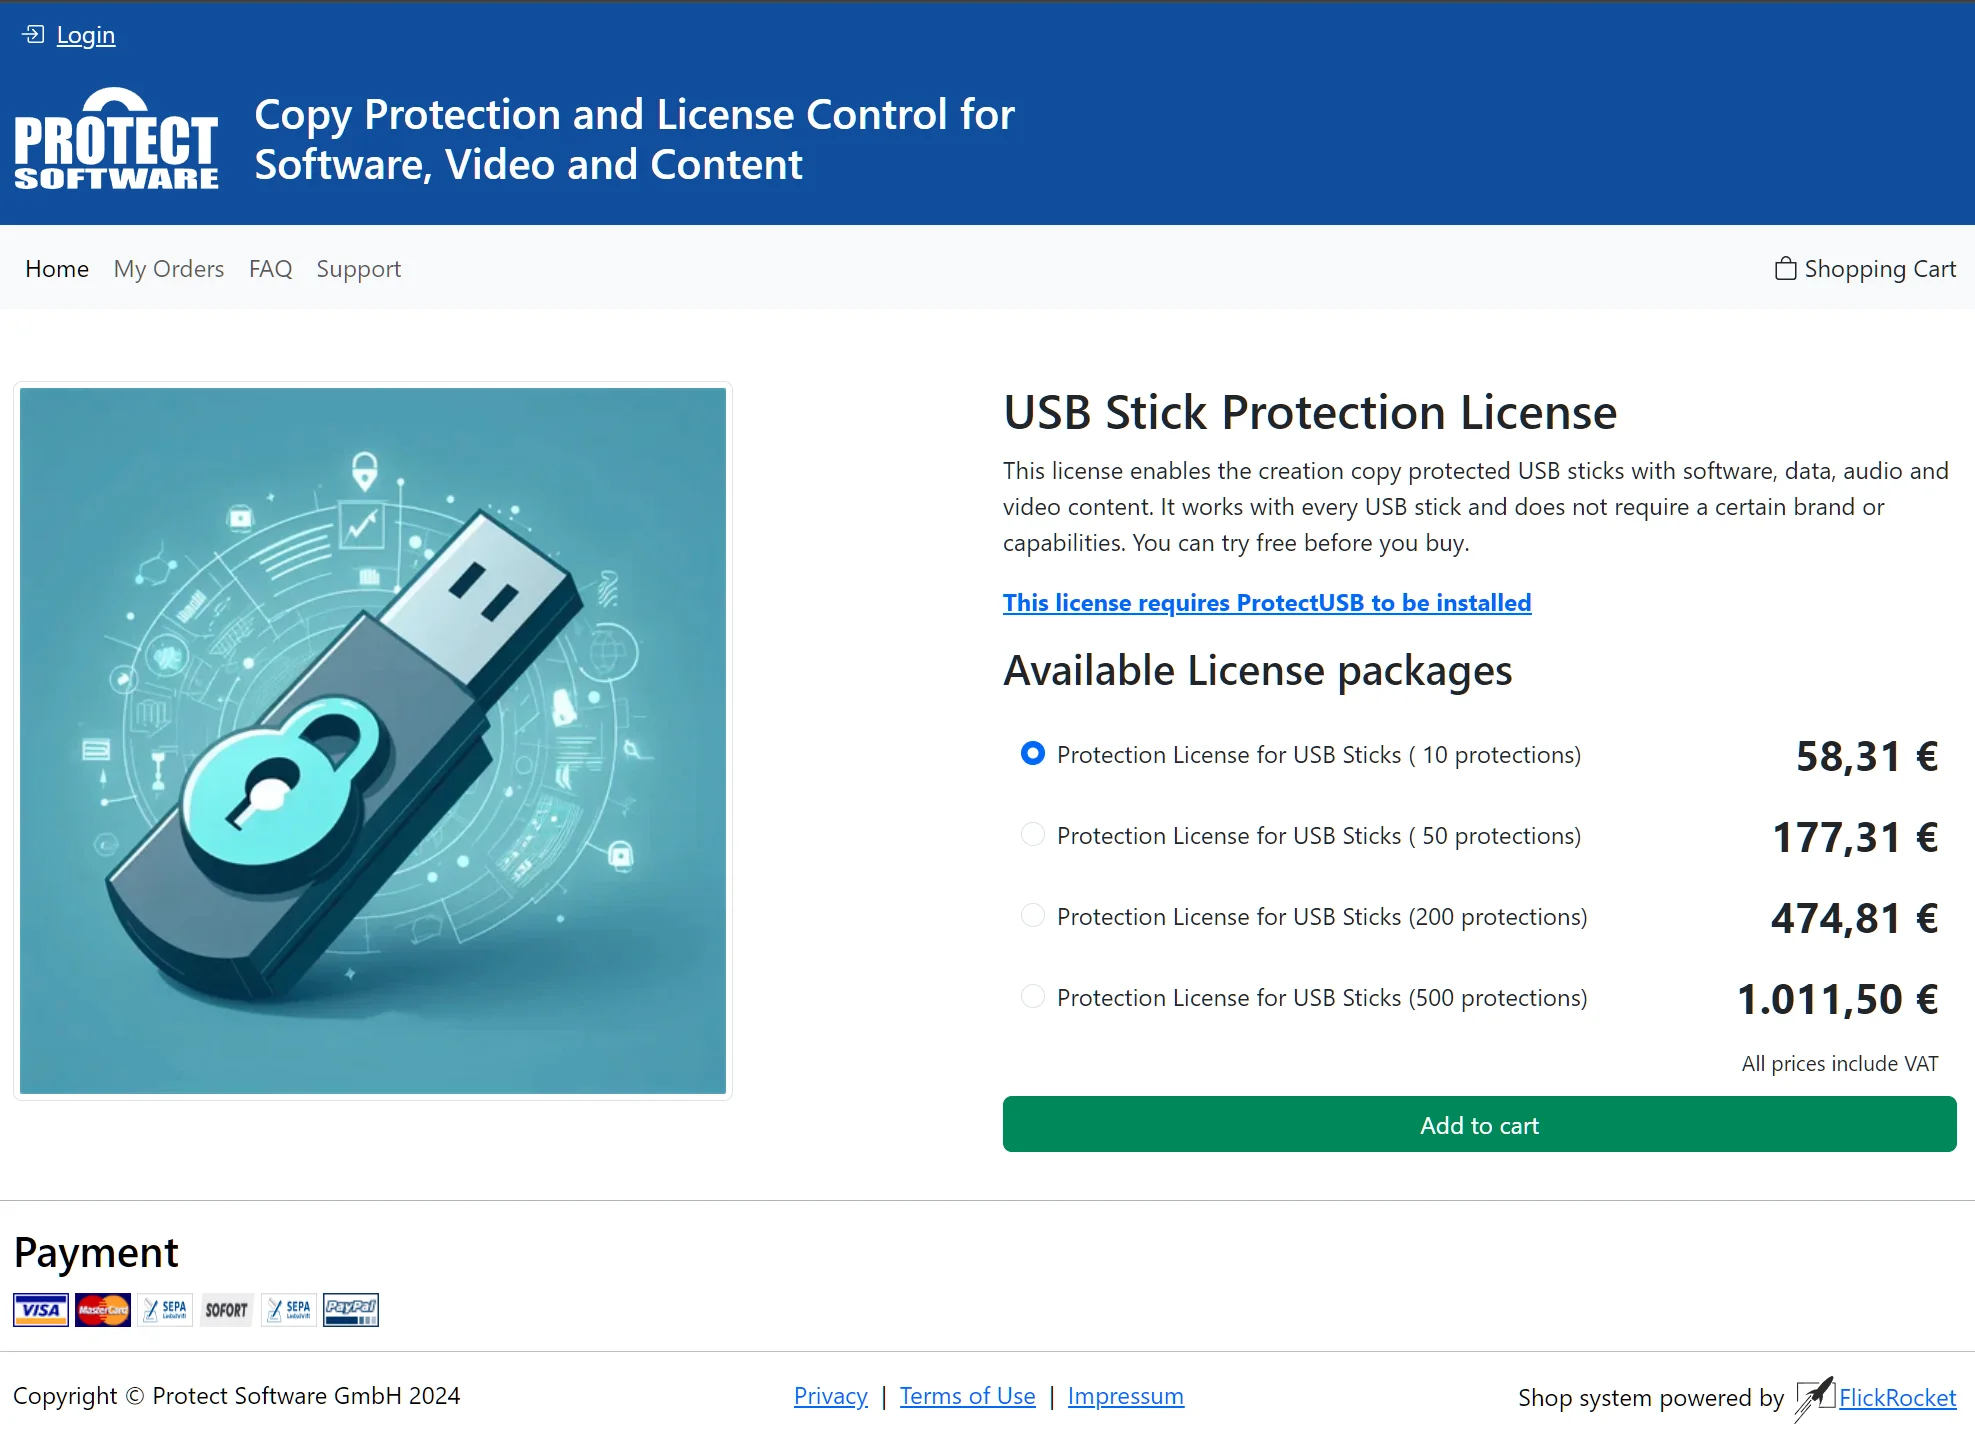
After the purchase completes, the licenses are automatically available in the USB writing tool.
If your content was prepared for UnlockCode usage, after checking the “Content” checkbox and selecting the folder with the prepared content, the window will look like the following.
Before you select “Start” to write the actual writing process to the connected USB sticks, you need to make sure the settings for the write process are correct.
| Option | Description |
| Content (Optional) | This content will be copied to the USB stick. If no content is specified, the USB stick(s) will only be licensed for the entered ProjectID. This option is useful for pre- or post-written USB(s) – meaning the content is already on the USB stick(s) or is added later. |
| ProjectID (Mandatory) | This is the ProjectID you created previously and used to package the content you want to bind to the USB stick(s). If you have already specified the content, the ProjectID may have been auto selected. |
| Create Demo | Activate this checkbox to create demo media. Demo media are not permitted to be given to 3rd parties and will display a warning message prior to presenting the content. |
| Target Selection |
This area lists all connected USB sticks. You can check the sticks you want to use for the copy/license operation. The USB stick(s) must be pre-formatted and writable. If you add additional USB sticks during the program is running, you need to click the Refresh button to display the newly added USB stick(s). |
| License Area |
This area displays the currently available number of licenses and enables you to buy additional licenses. Note: If you don’t have licenses, you can still prepare the USB stick(s) in a demo mode, by activating the “Create Demo Medium” checkbox. Important: These licenses are not used for UnlockCode based unlocks. |
To write one or more USB stick(s), you need to press “Start”.
After all USB sticks are written, you see the complete message.
To write more sticks, you just need to connect new sticks and press “Start” again.
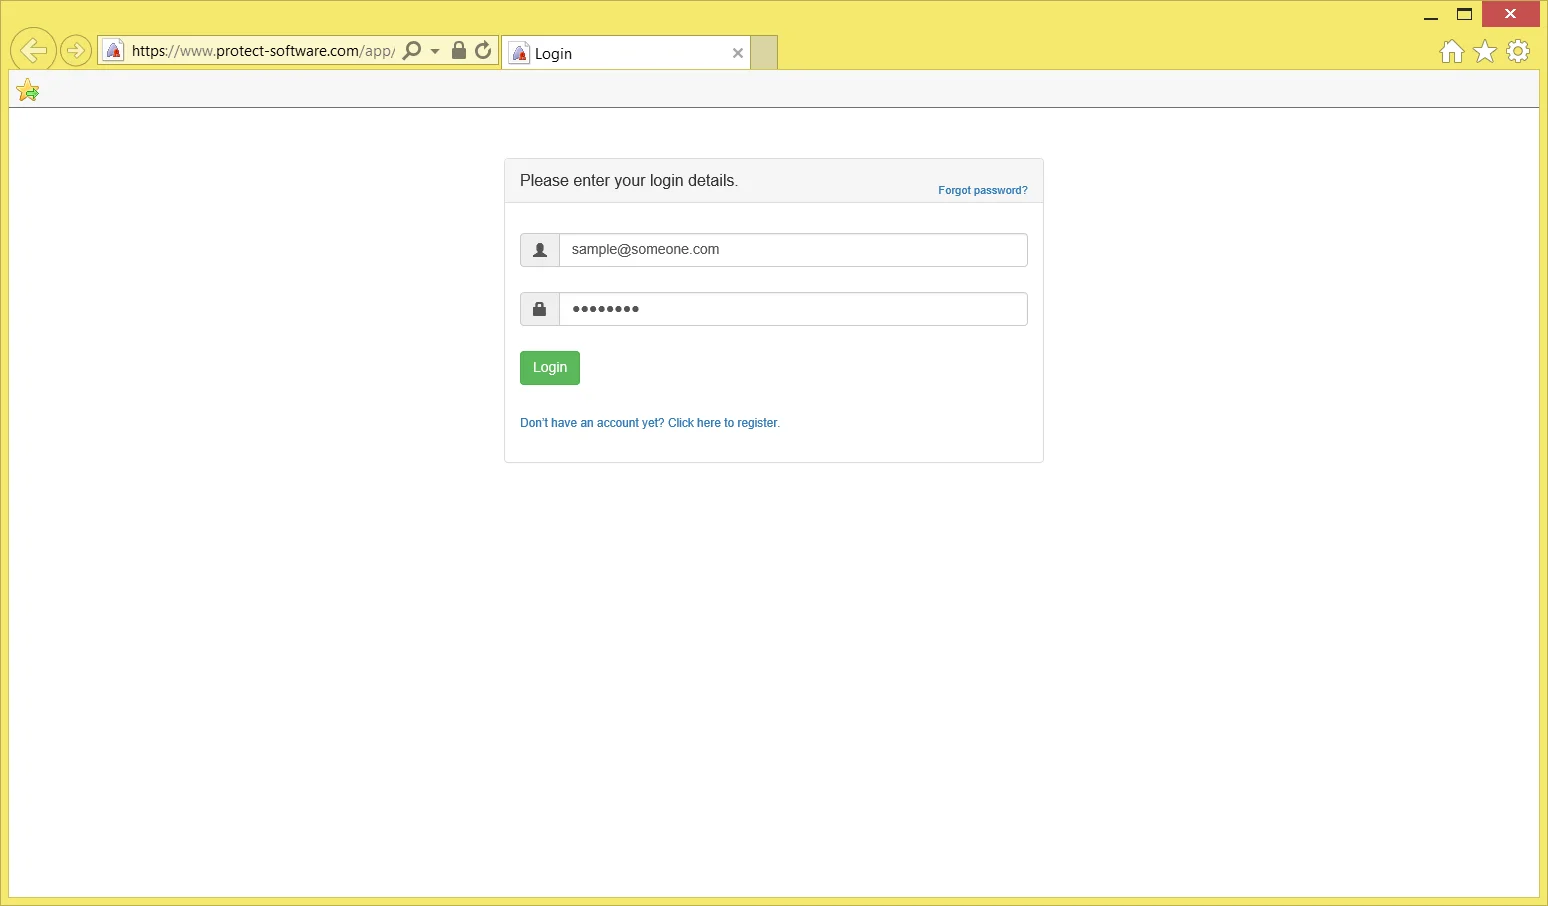
To unlock the content prepared for UnlockCode validation you need UnlockCodes which you can create on the Protect Software website. Just click the “Obtain UnlockCodes” link in USB Protect and login (if this does not happen automatically).
After login you are automatically located in the UnlockCode section of the Protect Software website. It lists the codes you have already created and you can create new codes by clicking the “Create UnlockCodes” button.
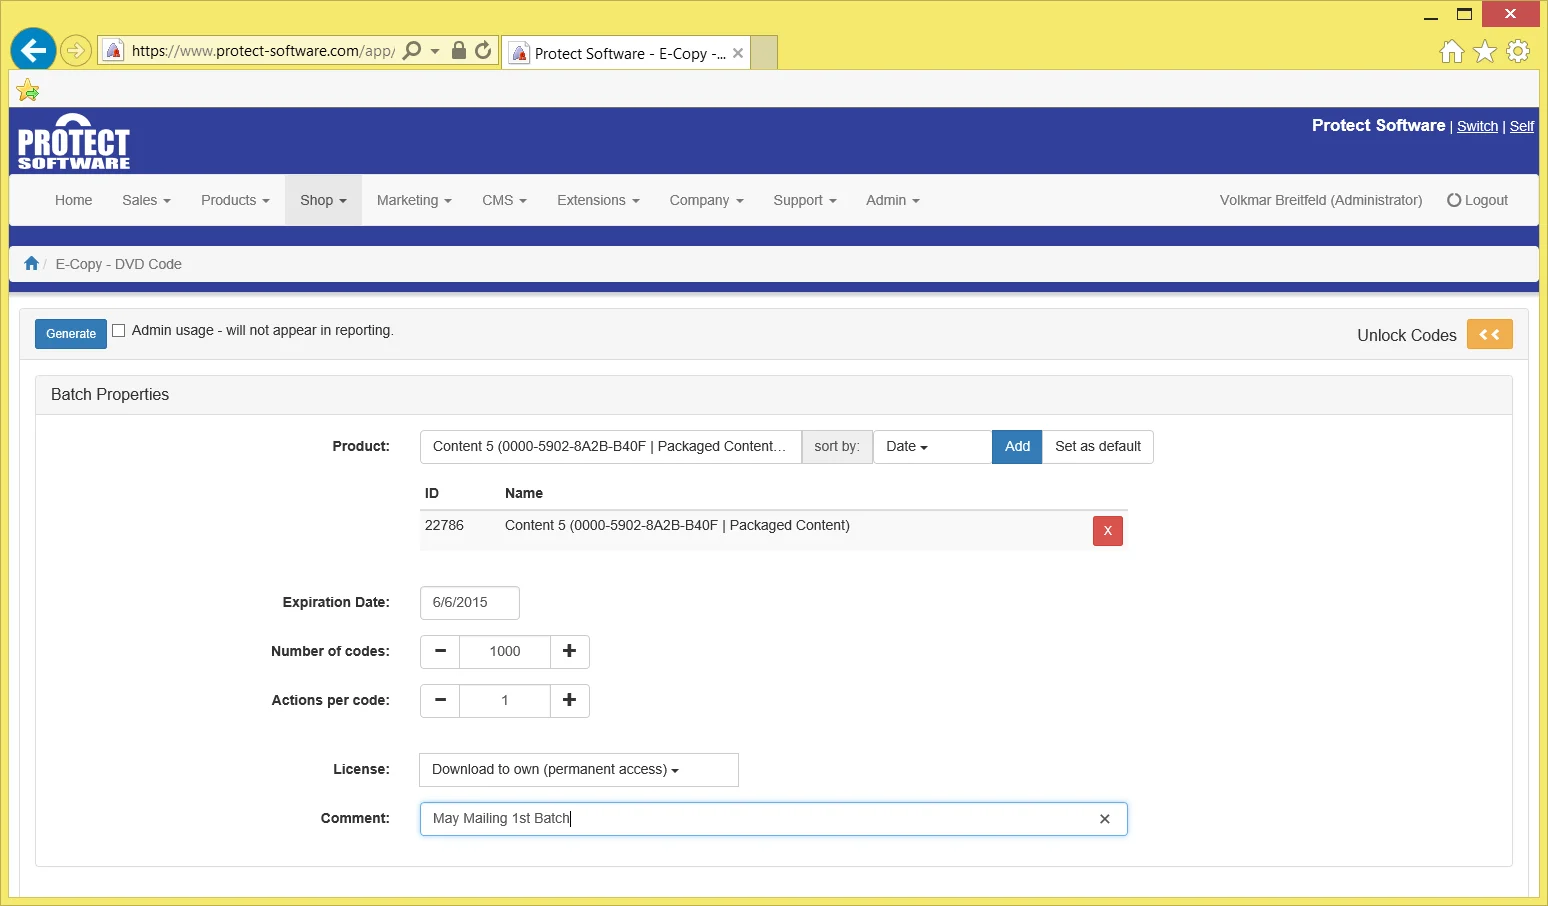
Make sure the setting are correct when you create codes.
| Option | Description |
| Product(s) | Select the products you want to unlock and click “Add” to add them to the created codes. Although you can add multiple products, in the typical ProtectUSB Content use case, you would only add the product which you have used for creating the content in the Content Preparer. |
| Expiration Date | The codes can only be used until the expiration date is reached. |
| License | The license under which the content should be unlocked. This can be a permanent “to-own” license or a temporary rental license. You can define your own licenses in the web interface. |
| Actions | The number of times a code can be redeemed. Typically this is set to one. |
| Theme | The theme to be used for redeeming the code in case a QR code is scanned. |
| Comment | The comment entered here is displayed in the list of codes and should be used for identification. |
| Number of codes | The number of codes to be created. |
After you did all settings, click the “Generate” button to generate the codes.
You can create UnlockCodes without charge as long as the following criteria are met:
There is no restriction to the number of codes you can create.
If you create regular codes without time limitation or with an expiration date of more than 3 days in the future, you are asked to place your payment data in the system.
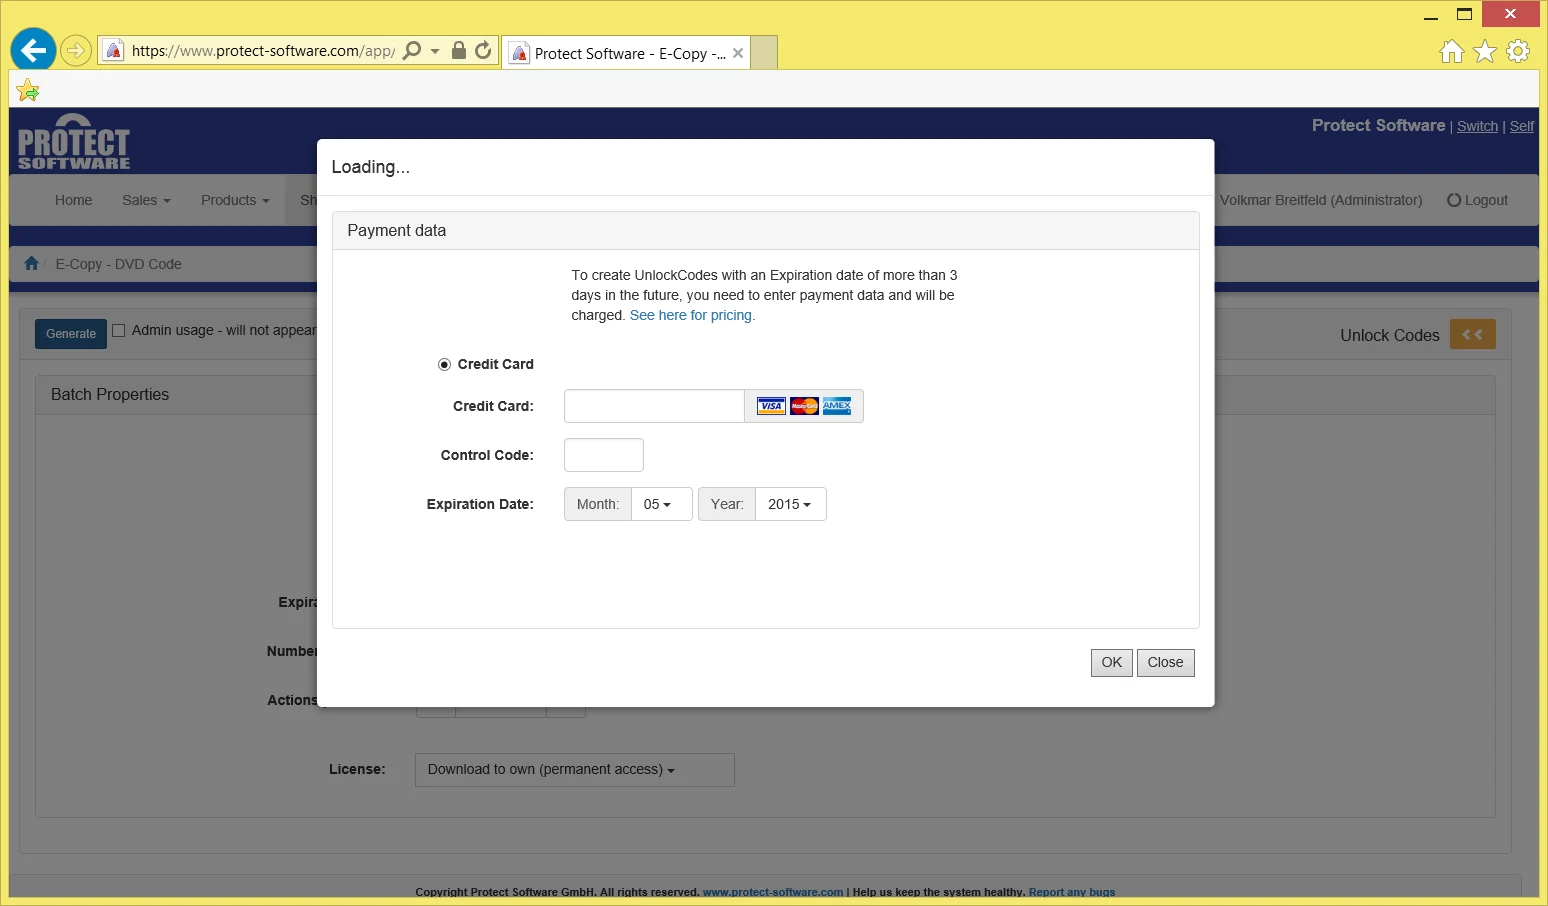
There is no immediate charge for the creation of codes. Instead, you will receive a monthly report and volume discounts are applied automatically. A link to the current pricing is displayed every time you create codes.